With Maya i have learned a lot and still am! Here are some points as to what i have learned so far on how to do certain things in Maya:
When creating anything in Maya don't create faces that can not be seen in game! this is because when running the game it can cause it to lag so it is unnecessary to have faces not being shown.
Beveling and Extruding an object pushes or sinks in an area of the object. This can create many things and can combat the problem from the point above - you can push an object out instead of creating a new object which creates unseen and unnecessary faces. You can find the Beveling and Extruding option under Edit Mesh.
You can break up objects into sections using the Cut Faces tool. This tool lets you cut an object with a straight line but it is dependent on the current camera angle. It is handy to break up objects for rendering or to delete edges and faces. You can also use the Interactive Split Tool/Split Polygon Tool which lets you cut up objects by free hand. Both options can be found under Edit Mesh.
UV Texture Maps basically show the net of a 3D object making it flat e.g. if you get a cereal box and unglued the seams it will be a flat net of that 3D object. With this we can save that net into a PSD file for Photoshop, paint over it and then put it back onto Maya where it will then wrap that net around the 3D object, creating a textured and rendered object. Here i will show a step by step guide on how to create a UV Texture Map.
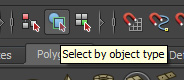
To create a UV Texture Map first select the object with the Select By Object Type option.
Next click on the UV Texture Map icon.
With the UV Texture Map now up (if needed) find out the areas that you may be applying detail to in photoshop and make a note. e.g. since i am creating a door there will be sections where the wood is coloured and there will be hinges on the door so i need to find out where they are so i can detail them. You can find this out my selecting a face on the 3D object which will be highlighted on the UV Texture Map.
On the image above, on the Left is the 3D object and on the right is the UV Texture Map.
On the image below you can see that i have selected one of the faces on the 3D object which has shown up on the UV Texture Map, singling out the face i have selected. You can select multiple faces as well which will single out and show up on the UV Texture Map.
Now we need to create a Lambert onto the selected object, this will allow us to wrap our image around the selected object.
First, select the object then right click and go down to faces, then to Assign Favorite Material then select Lambert. And then you have created a Lambert!!
Next (making sure the object is selected!) on the UV Texture Map click Image then Create PSD Network and it will come up with this:
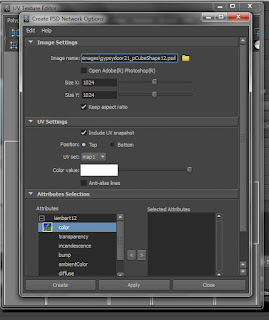
Now, click the file button at the top left and choose where to save your file and what name to save it as. At the bottom under Attributes you should see the Lambert you have just created. Click colour then the right arrow which will then move it to the box next to it called Selected Attributes.
And then click create! The UV Texture Map will have saved into a PSD file ready to be moved onto Photoshop to colour. Before you start though, in Photoshop flatten your image because you cant paint under the the background or the UV map as Maya wont be able to wrap the image around the object properly, the colour has to go over the UV Texture Map.
*********************TIP*********************
Rather than selecting the WHOLE object to create into a UV Texture Map, do so in sections as when you select the whole object and then look at its UV Texture Map it will be everywhere and parts will overlap and you wont be able to tell which is what part, consequently you wont be able to colour it in Photoshop accurately!


